
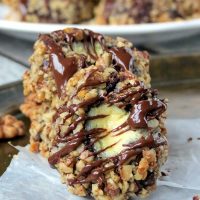
My holiday baking continues with these melt-in-your-mouth thumbprint cookies. These cookies may look like popular turtle thumbprints cookies… But they are not.

Thumbprint cookies certainly aren’t anything new. I decided to make these cookies a little different from typical ones. The main and the most important difference is the filling. Instead of salted caramel, these cookies are filled with cream cheese. I love salted caramel, but even more I love cream cheese!

How cute are these? They make the perfect sweet treat for any occasion. I love how the walnut pieces give the cookies a great texture and that extra nutty flavor. But the best part is definitely the zesty cream cheese filling, which makes them so unique and tasty!

A little drizzle of chocolate gives these cookies the perfect finish. Delicious and pretty all at once. These cute thumbprints are sure to be a hit on your holiday cookie plate!
Enjoy and Happy Holidays! See you next year!
xo
Ingredients
For the cookies:
- 1 cup butter , softened to room temperature
- 1/3 cup brown sugar
- 1/4 teaspoon salt
- 1 egg yolk
- 1 teaspoon vanilla extract
- 1 3/4 cups all-purpose flour
- 1/4 cup cocoa powder
- 2 egg whites
- 1 1/2 cups finely chopped walnuts
For the filling:
- 4 oz. (115g) cream cheese , softened
- 1/4 cup sugar
- 2 teaspoons lemon zest
- 1/8 teaspoon salt
- 1 egg yolk
- 1/4 teaspoon vanilla
For the chocolate layer:
- 3 oz. (85g) chopped milk chocolate or dark chocolate
- 2 teaspoons shortening
Instructions
- In the bowl of an electric stand mixer fitted with the paddle attachment, whip butter, sugar and salt on medium speed until smooth and creamy. Mix in egg yolk and vanilla. In a separate bowl, combine flour and cocoa powder. Gradually add flour mixture, beating at low speed until well mixed and dough forms. Cover dough and refrigerate for about 30 minutes.
- Preheat oven to 350 degrees F. Line 2 baking sheets with parchment paper or a Silpat.
- Roll the cookie dough into about 1 tablespoon balls using your hands. Make sure they're nice and smooth.
- Place egg whites in a shallow bowl and lightly whisk. In another shallow bowl, place chopped walnuts. Dip each ball into egg whites, then roll each ball in chopped nuts (if necessary, you can gently press into the nuts to help them stick). Place cookies about 1-2 inches apart on the baking sheet. Make an indentation with your thumb (or something like the handle of a wooden spoon) into each ball. Bake for 8-9 minutes.
- Meanwhile, make the filling: using an electric mixer on medium speed, beat cream cheese until light and fluffy. Add sugar, lemon zest and salt. Mix until smooth. Add egg yolk and vanilla, and beat until smooth.
- Remove cookies from oven. Using the handle of a wooden spoon, gently press down on existing indentation (to create more space for cream cheese filling). Spoon a teaspoon of the filling into each indentation. Mound the filling slightly. Bake for an additional 8 minutes, until filling is set. Allow the cookies to cool on the baking sheet for 5 minutes before transferring to a wire rack.
- Melt the chocolate and shortening in the microwave, and scoop into a ziplock bag. Barely snip the corner and drizzle over the cookies. Allow to set.
Notes


2 Comments
Sue
December 29, 2014 at 4:08 amThese look sooo good. Love your recipes…
Hope you have a Happy New Year.
Jovita
December 29, 2014 at 8:56 amThank you so much and Happy New Year you too, Sue!